Throughout history hair and dress have been used to distinguish gender and social status, and this was no different in pre-Alexandrian Egypt. The use of wigs as a replacement for one’s natural hair served both practical and decorative purposes, and could be indicative of one’s social background and economic position. Such wigs were worn by both men and women but were less common for children. Wigs could be used to hide signs of ageing, and were associated with cleanliness due to being easy to clean and preventing lice. It became fashionable amongst the elite to wear black wigs on top of or as a replacement for natural hair, with red and brown hair becoming more associated with members of the lower classes who may be unable to afford their own wigs. Those who could afford them would wear wigs made from human or animal hair, while those of less affluent means could use wool or even palm fibre. Wigs were often perfumed with the most expensive fashions including built in perfume containers made from wax. These would melt and slowly release the myrrh within. For men, beards were not commonly worn, being sacred to Pharaohs who are known to have worn false beards.
 |
| Limestone Relief of Maat featuring a Tripartite Wig from Dynasty XVII. Florence Museum of Archaeology 20/02/16. |
There have been several surviving wigs discovered which can be compared with the appearance of figures in contemporary artwork. These demonstrate a variety of styles. One of the most common of these styles appears to be the tripartite wigs which consisted of three parts: one at the back and one over either shoulder. These wigs appear to commonly consist of dreadlocks at the top, with longer curls or braids underneath. Other fashions included dreadlocks, curls, or braids of a uniform length which covered the shoulders. For the elite, wigs often included gold and lapis lazuli beads which could be braided into hair.
 |
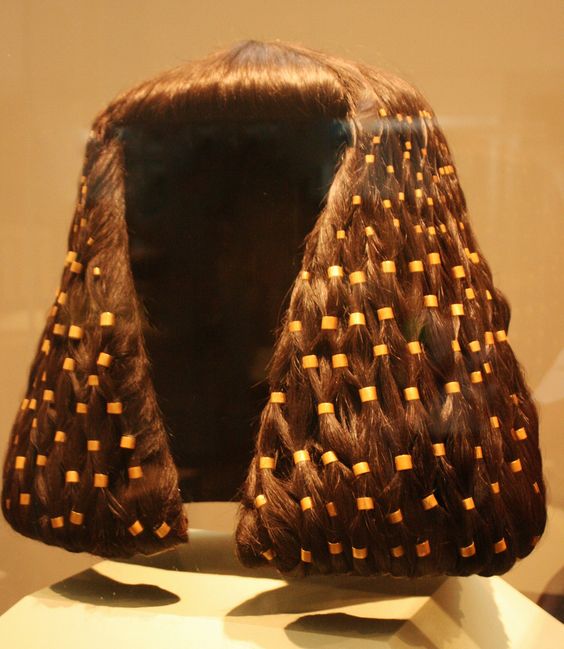
| A Layered Wig from Dynasty XVIII discovered in a Tomb in Thebes. British Museum 20/02/16. |
The basis of these wigs was a mesh which fitted around the head, These could be made from palm fibre or wool although hair was preferred due to the elasticity it provided. Strands of hair were woven together into thicker strands and attached to the delicate mesh. This was done by winding the strands around the mesh and pressing it into a substance consisting of bees wax and resin. This anchored the hair to the mesh and added volume to the wig. This waxy substance could be used to add curls to the hair and likely contributed to the preservation of such wigs.
To create your own:
I would recommend the use of a wig rather than your own hair as these fashions would be permanent and may not be suitable for all hair types.
Materials:
Some of the materials used in traditional wig making may be difficult to acquire so here are some cheaper alternatives you could use.
 |
| Adorned Wig from Dynasty XII discovered in El-Lahun. Metropolitan Museum of Art. 20/02/16. |
- If you intend to make your own wig, the easiest base would be a mesh cap of the colour you wish your wig to be. These can be acquired cheaply and are usually highly elastic meaning that they will fit well over most hair.
- For the actual hair you could use fine string or hair extensions. If you are using hair extensions and wish to use curls or dreadlocks it may be more effective to avoid plastic extensions.
- In place of the wax and resin solution hair or nail glue is suitable for sealing the hair to the mesh. Ensure that the glue is completely dry before wearing the wig so that it does not stick.
Making the Wig:
- Separate the hair into small sections which will fit through the holes in the mesh.
- It's best to turn the mesh inside out when attaching the hair. For ease of access, I would recommend starting near the centre of the mesh. Pull the sections of hair through the mesh one at a time. Fold them at the end and push this through the next section of the mesh so that the hair is folded around a strand of the mesh.
- Wrap the folded section around the longer strands of hair so that the mesh is within a sort of lasso. Add the glue to where the two parts of hair meet and leave to dry.
- Repeat this with the rest of the hair until the wig is full. Ensure that the glue is dry before continuing.
To Style:
When altering the length of the wig it is best to have someone model the wig. This will enable you to see more easily what the length will look like when worn.
- To create a layered wig. Separate the hair so that the hair above the level of the ears is apart from the rest. Separate the remaining hair - the lower section - into three sections: the back, and the sides, which should fall naturally over the shoulders. Ensure that these three sections are of a uniform length. Mark the length of this section with some tape before tying it back so that it is not in the way.
- Now focus on the upper layer of hair. When cutting this remember that styling it will reduce it's length. Leave an inch or two to accommodate for this, you can always trim it later if you're slightly off. Separate the hair so that falls naturally into three sections as with the longer section. Ensure when cutting that the length is uniform. This should be several inches shorter than the lower section but no shorter than shoulder length when styled.
- When styling, the upper section of the wig can be curled or made into dreadlocks, while the lower section can consist of dreadlocks, curls, or braids.
- To create a uniform wig. Separate the hair into three sections: the back and two sides, where the sides fall naturally over the shoulder. Cut to a uniform length, but remember that styling will shorten it so you should leave an additional inch or two.
- When styling, the wig can consist of dreadlocks, curls, or braids.
 |
| Wig with Headpiece from Dynasty XVIII discovered in the tomb of the three lesser brides of Thutmose III. Metropolitan Museum of Art. 20/02/16. |
- When braiding. Braids should be thin, although most types of braid will work. To add some colour to your wig you can add beads to the braids. To achieve a traditional effect, gold and pale blue beads should be used. Wider flat - almost button like - pieces with metal colouring can be used for additional decoration.
- When creating dreadlocks. Separate the hair into sections. Remember that these will shrink so create them slightly larger than you would want them to be when the wig is completed.
- One by one, back comb these sections and twist them so that they are tight.
- Steam the dreads. You can do this with a steamer or by dipping the dreads into boiling water and drying them with hot air from a blow dryer. The latter section may be more suitable if you are creating a layered wig as this should not affect the rest of the wig. Ensure that the dreadlocks remain twisted as you do this and that the ends of the dreadlocks are sealed.
- This section of the wig may seem a bit thin so you can create additional dreadlocks with spare hair and attach them to the wig to add volume. It's best to do this in lower sections where possible so that the point where they attach to the mesh is less obvious.
- When curling. The easiest way to curl hair is with hair curlers or straighteners. If the curls go lax in between uses, simply re-curl the affected areas.
Have fun trying it out yourself and if you want to read more about the subject, here's some extra reading:
Bronwyn + Cosgrave. The Complete history of costume and fashion: from ancient Egypt to the present day. 2001.
Cox, J, S. The Construction of an Ancient Egyptian Wig (c. 1400BC) in the British Museum. 1977.
Laver, J. Fashion: From Ancient Egypt to the present day. 1965.
Lowery, A. Historical Wig Styling: Ancient Egypt to the 1830s. 2013.
Robins, G. Hair and the Construction of Identity in Ancient Egypt c. 1480-1350BC. 1999.
No comments:
Post a Comment